Ain’t no rest for the wicked..!
Borderlands 3 is coming soon and I couldn’t resist to do Maya’s cosplay! I totally fell in love with her new design and as you could see on my instagram a couple of weeks ago I’ve started crafting it!
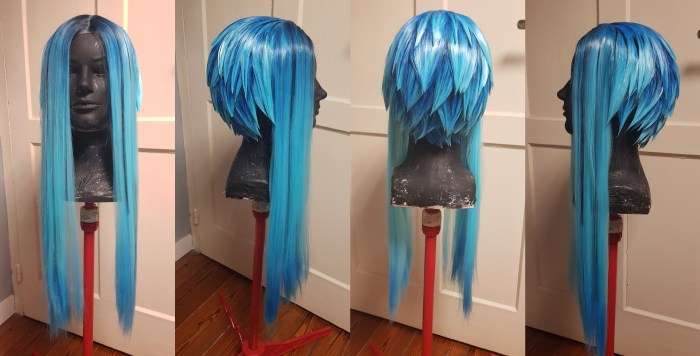
The first piece that I’ve finished is her wig. I’m not an expert in doing this kind of wigs (in fact this was my first time doing a spiky wig), but I hope you can learn something from this brief tutorial.
 First of all, you can download the cosplay reference guide at Borderlands website, which is suuper helpful!
As base, I used a cheap blue lacefront wig from Aliexpress. It costed around 23€ and it didn’t have too much hair but the color was very bright and exactly the one I was looking for! The one I purchased is no longer available but I’m sure you can find something similar there or in other wig websites.
I decided to choose a light wig to be able to darken the roots and the hair tips.
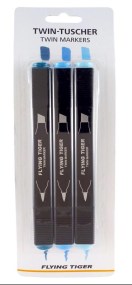
To dye the wig I used alcohol based markers and acrylic paint
This kind of markers are like the ones from Copic, but cheaper. I’ve got this set of 3 markers for just 3€ at Flying Tiger and they worked great! I used two sets of markers to dye the whole wig.
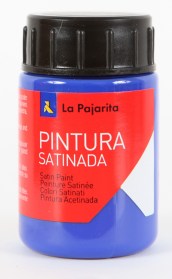
I also added some final touches with diluted acrylic paint from La Pajarita. This is a spanish brand of water based latex paint but I bet you can find something similar in your country. I’ve learned this technique from Alyson’s Tabbitha youtube videos which I totally recommend you.
Let’s get down to business!

")
First thing I did was to separate the frontal wefts of hair and tie the rest in the back of the wig. Then I started to dye the roots and the hair tips with the markers. First use the lightest tone and then keep adding darker ones until you reach the desired gradient tone. I’ve also used a black marker for the roots.
Start doing the inner layers of hair and keep painting the roots until you reach the top ones.


The next step was to cut the back of the wig. Don’t forget to keep the wefts because if your wig has as few hair as mine you will need to glue some of them to the roots to get more hair density. I did this with hot glue. Be careful and don’t burn your fingers!
Also don’t cut the hair too short. You can cut it again if you think it’s too long. To make the spikes I worked in layers from the bottom of the head to the top.


The process I followed was :
- Dye each spike with the markers
- Trim and shape each one.
- Finally added a gradient of acrylic paint very diluted in water to each spike before starting with the next layer.
To make the spiky shapes, first I separated each one (and in one layer at a time). I used smalls scissors to trim the ends of each spike (this will help to keep the pointy look), then added some hairspray (I always use got2b because its SUPER strong), and heated it up with a hairdryer. You have to work on each spike until you get the shape you want to. To prevent splitting hairs I used a tiny bit of transparent wood glue to keep them together.
-> Help me to create more cosplays and tutorials donating a ko-fi here! 🙂


Be patience and repeat this process until you finish every layer! And once you are done set everything again with a lot of hairspray to keep everything in place!
“That was satisfying, huh?”
Hope this tutorial is useful to you! If you want to see all the process about how I make my Maya cosplay don’t forget to follow my instagram ! There I post every work in progress picture that I take! ❤
You can support my work sharing it, getting prints and patterns at my Etsy or donating a ko-fi.