I’m currently working on a commission and I’m having a lot of fun with it! I’m crafting Dark Link’s Sword, Shield and bracelet armor.

I would like to show you step by step how I made the armor piece.
Materials used:
- Eva Foam
- Worbla Black Art
- Heat gun
- Hot glue
- Scissors, ruler, marker, paper, sculpting tool…
- Black and silver paint, white posca.

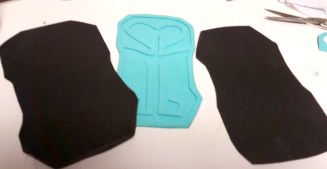
1.First I made a paper template. I used the customer measurements as reference to get the right proportion.
I usually do a free hand drawing first and then I use a ruler to make straight lines. To get a symmetric pattern I fold the paper and just draw half of the design. Then I cut it with the paper folded to get a perfect pattern.
 2. The second step was to draw the pattern in EVA foam. This armor pieces have several details, so I cut two pieces, one for the base and the other one for the edges and details.
Over one of the eva foam pieces I traced the details, then cut it with a cutter and glued it to the base with hot glue.
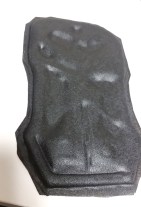
3. In this picture you can see how it looks before covering it all with worbla. The next step was to cut two worbla pieces a bit bigger than the shape of the piece. I usually cut them with 1cm margin around the pattern.
4. Then I made a “worbla sandwich”. You have to place the foam piece between the two worbla layers. Remember that the sticky part of worbla should be facing the foam piece.
When you heat the worbla it sticks to the foam. You have to make some pressure to reveal all the details. I usually work with a sculpting tool to do this process. Work with care because you don’t want to break your worbla! Also try to not overheat it because bubbles will appear. It´s important to bend the borders together properly so they won’t open when you cut the worbla excess.
 5. Look how it changes when all the details are traced!
6. To get the curvy arm shape I heated all the piece and started blending it around my arm ( be careful and don’t burn yourself!) to get the right shape
7. Finally it’s time to paint! First I applied a black base coat and the using the dry brush technique I added some silver lights. The details where painted in a bright silver tone and the highlights were remarked with a white posca pen.
And done! I hope you have enjoyed this ! If you want to help me to create more tutorials like this one you can support me on ko-fi! All the funds will be invested in new cosplay materials for tutorials 🙂


One thought on “Dark Link Armor Tutorial – Worbla”